Export Nested Grid or Custom Data Formats to Excel in Dynamics 365
In this blog, we will explore how to export nested grid data from Dynamics to Excel.
Problem Statement: Our client required an "Export to Excel" functionality for a nested grid. However, the out-of-the-box Export to Excel feature does not support nested grids.
To address this, I developed a custom Export to Excel functionality for nested grids. You can use this same approach if you have requirement for customized excel format functionality.
Let’s see how you can achieve the same if you encounter this requirement.
My nested grid is on the Contact entity, displaying the hierarchy of parent and child cases.

Let’s break down the solution into steps:
Create a custom workflow activity to build an HTML string of the cases.Create an action that internally calls the custom workflow activity.
Call the action in a JavaScript function to retrieve the content and download the Excel file.
Create a ribbon button and attach the JavaScript function to it.
1. Creating a Custom Workflow Activity
You can find the complete code Here.

In the code, you’ll notice that I initially create an HTML string with different styles required to define data for Parent and Child Cases. Styles starting with 'p' are for Parent Cases, while those starting with 'c' are for Child Cases.
Once the initial HTML with all required styles is built, I create a table with the first row containing the column names for the Parent Case header.

Next, I retrieve all the cases for the contact (provided as an input parameter) and start building rows for the Parent Cases first.

After adding a Parent Case row, I find all the Child Cases associated with that Parent Case and build their rows as well. For Child Cases, I leave the first column empty to create a nested structure in Excel. This will become clearer when you see the output.
Once all the row data is built, I set the completed HTML string to the output variable.
Build and register this plugin assembly on the CRM server.
2. Creating an Action

In the action, I call the assembly registered in the previous step. The output from the execution is stored in the action’s output variable.
3. Writing a JavaScript Function to Call the Action
The code makes a call to the action created in the previous step, passing the contact ID as a parameter. You can find the complete code Here
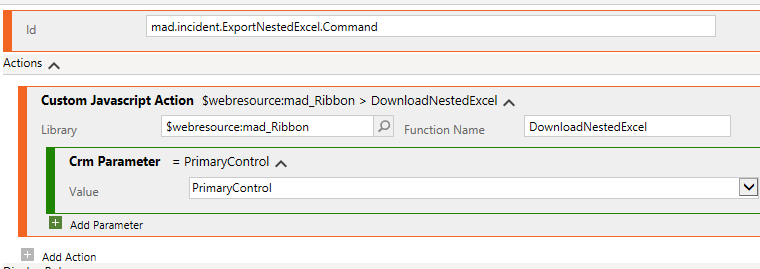
4. Adding a Custom Button
A custom ribbon button is added to the Case subgrid and linked to the JavaScript function created in the previous step.


Can you explain how we can do this: Build and register this plugin assembly on the CRM server. ?
ReplyDelete